Are you tired of digging through your kitchen cabinets, searching for the right container, only to find a messy pile of unlabeled jars and boxes? Labeling your kitchen storage containers can change the way you organize your space and save you time every day.
Imagine opening a cabinet and instantly spotting exactly what you need—no more guessing, no more spills, no more frustration. You’ll discover simple, effective ways to label your containers so your kitchen stays neat, your ingredients stay fresh, and your cooking becomes easier than ever.
Ready to transform your kitchen organization? Let’s dive in!
Choosing The Right Containers
Choosing the right containers helps keep your kitchen neat and organized. Good containers protect food and save space. They also make labeling easier and more effective. Consider different materials, sizes, and shapes before buying containers. This way, you can find the best fit for your kitchen and storage needs.
Materials And Sizes
Containers come in many materials. Plastic containers are lightweight and often affordable. Glass containers last longer and do not absorb smells. Metal containers work well for dry goods like flour or sugar. Choose materials that suit the food you store.
Sizes matter. Small containers hold spices or nuts. Medium ones fit snacks or leftovers. Large containers store bulk items like rice or pasta. Use various sizes to keep everything neat and easy to find.
Stackable And Space-saving Options
Stackable containers save counter and shelf space. They fit tightly on top of each other. This helps avoid clutter and keeps your kitchen tidy. Look for containers with flat lids that lock securely.
Consider containers with clear sides. They make it simple to see what’s inside. Space-saving designs can fit in cabinets or drawers easily. This keeps your kitchen organized without wasting space.
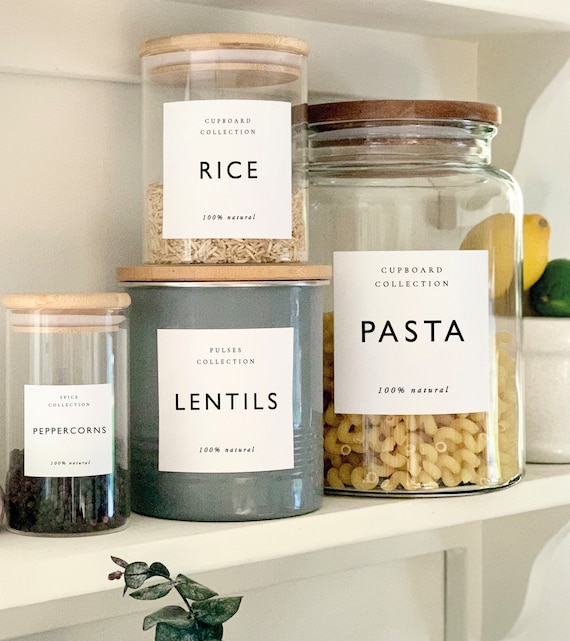
Credit: www.etsy.com
Labeling Methods
Labeling kitchen storage containers makes your kitchen neat and easy to use. Clear labels help you find ingredients fast. They also keep your food fresh and organized. Different methods suit different needs and styles. Choose the best one for your kitchen.
Using Chalkboard Labels
Chalkboard labels are reusable and stylish. Write with chalk or chalk markers for a clean look. Erase and rewrite as needed. These labels work well for dry goods like flour and sugar. They add a rustic touch to your kitchen decor.
Printable Sticker Labels
Printable sticker labels offer a professional and uniform look. Design and print labels at home using a computer. Use waterproof paper for durability. These labels suit long-term storage and pantry items. Customize font and color to match your kitchen style.
Handwritten Labels With Permanent Markers
Handwritten labels are quick and personal. Use permanent markers on blank stickers or masking tape. This method works best for small containers. It’s easy to update by replacing the label. Handwriting adds charm and a homemade feel.
Magnetic Labels
Magnetic labels stick to metal containers or shelves. They are easy to move and reuse. Write on them with dry erase or permanent markers. Magnetic labels keep your kitchen flexible and tidy. Perfect for metal tins and spice jars.
Label Placement Tips
Choosing the right place to put labels on kitchen storage containers makes a big difference. Good label placement helps find items quickly. It keeps your kitchen neat and saves time. This section shares simple tips on where to put labels for the best results.
Front Vs. Lid Labeling
Labels on the front of containers are easy to see. You can read them without moving the container. This works best for containers stacked on shelves or in cabinets.
Labels on lids are helpful for containers stored in drawers or deep shelves. You see the label when you open a drawer or look from above. Choose lid labeling if your containers are mostly stacked.
Think about how you store containers before choosing label placement. Front labels suit open shelves. Lid labels fit drawer or stack storage styles.
Ensuring Visibility And Readability
Use clear, large fonts on labels. Avoid fancy scripts that are hard to read. Black text on white or light backgrounds works well.
Place labels at eye level or where you naturally look. Avoid placing labels on curved or uneven surfaces. This can make labels hard to read.
Keep labels clean and free from grease or moisture. Use waterproof labels or covers for containers in humid areas. This keeps labels clear and readable for longer.

Credit: www.amazon.com
Organizing By Category
Organizing kitchen storage containers by category helps keep your kitchen tidy and efficient. It makes finding ingredients faster and reduces clutter. Sorting containers into groups allows you to label clearly. This method saves time during meal prep and grocery shopping.
Grouping Similar Items
Group items that belong together. For example, place all baking supplies in one section. Keep grains like rice, oats, and quinoa in another. This method creates order and prevents confusion. It also helps track what you have and what you need.
Color-coding Systems
Use colors to separate categories visually. Assign a color to each type of food, like green for vegetables or red for spices. Color-coded labels make it easy to spot items at a glance. This system is helpful for families with children or busy cooks. It adds a simple, clear way to organize your kitchen.
Maintaining Your Labels
Maintaining your kitchen storage container labels is key for long-term organization. Well-kept labels stay clear and readable. They help you find ingredients fast and keep your kitchen tidy. Simple care steps can make your labels last longer.
Cleaning And Durability
Clean labels gently with a soft cloth and mild soap. Avoid harsh scrubbing that can damage the print. Use water sparingly around paper labels to prevent peeling. Choose waterproof or laminated labels for wet areas. These last longer and resist stains.
Updating And Replacing Labels
Check your labels regularly for wear or fading. Replace labels when text becomes hard to read. Use erasable labels or chalkboard stickers for easy updates. Clear, updated labels prevent confusion and keep your kitchen efficient. Swap old labels quickly to maintain order.
Creative Label Ideas
Creative labels make kitchen storage containers both useful and attractive. They help find items fast and add a personal touch. Simple ideas turn plain containers into stylish kitchen helpers. Use designs that fit your style and kitchen look.
Using Decorative Fonts
Choose fonts that are easy to read but have style. Script or handwritten fonts add charm without losing clarity. Mix bold and light fonts to highlight key words. Use font size to separate titles from details. Make sure fonts match your kitchen’s vibe.
Incorporating Icons And Symbols
Icons help identify contents quickly without reading. A small leaf for herbs or a wheat symbol for flour works well. Use simple shapes that everyone understands. Combine icons with words for clear labels. Color-code icons to make sorting easier.

Credit: www.amazon.com
Frequently Asked Questions
How Do I Choose The Best Labels For Kitchen Containers?
Pick waterproof, smudge-proof labels that stick well and are easy to read.
What Information Should I Include On Kitchen Container Labels?
Write the item name and date of storage to keep food fresh and organized.
Can I Reuse Labels On Kitchen Storage Containers?
Use removable or wipe-off labels to change contents without leaving residue.
How Can Labeling Improve Kitchen Organization And Efficiency?
Labels help find items quickly and reduce food waste by tracking freshness.
Conclusion
Labeling kitchen storage containers keeps your space neat and easy to use. Clear labels help find ingredients fast and reduce food waste. Use simple words and readable fonts for best results. Choose labels that stick well and resist moisture. Regularly update labels to match what’s inside.
A well-labeled kitchen saves time and makes cooking more fun. Try these tips and see the difference today. Organize smartly, cook happily.