Are you tired of guessing how long to cook your eggs just right? Imagine having perfectly cooked eggs every time, without the mess or hassle.
Using an egg cooker can make your mornings smoother and your meals tastier. In this guide, you’ll discover simple steps to master your egg cooker and enjoy eggs exactly the way you like them—whether soft, medium, or hard-boiled. Keep reading, and you’ll never have to worry about overcooked or undercooked eggs again.

Credit: www.hestiaappliances.com
Choosing The Right Egg Cooker
Choosing the right egg cooker makes cooking eggs simple and fast. The perfect cooker fits your needs and kitchen space. Picking one that matches your lifestyle saves time and effort.
Types Of Egg Cookers
There are several types of egg cookers. Electric steamers cook eggs by steaming them. Some models use microwave technology for quick results. Others are manual and use boiling water. Choose a type based on how you like to cook eggs and how fast you want them ready.
Features To Look For
Look for easy-to-use controls and clear instructions. Automatic shut-off helps prevent overcooking. Some cookers have timers and different settings for soft, medium, or hard eggs. A non-stick surface makes cleaning simple. Safety features like cool-touch handles are useful too.
Capacity And Size
Egg cookers come in various sizes. Small cookers fit one to six eggs. Large models can cook a dozen or more at once. Think about how many eggs you eat daily. Also, check your kitchen space to find the best size. A compact cooker fits small kitchens well.
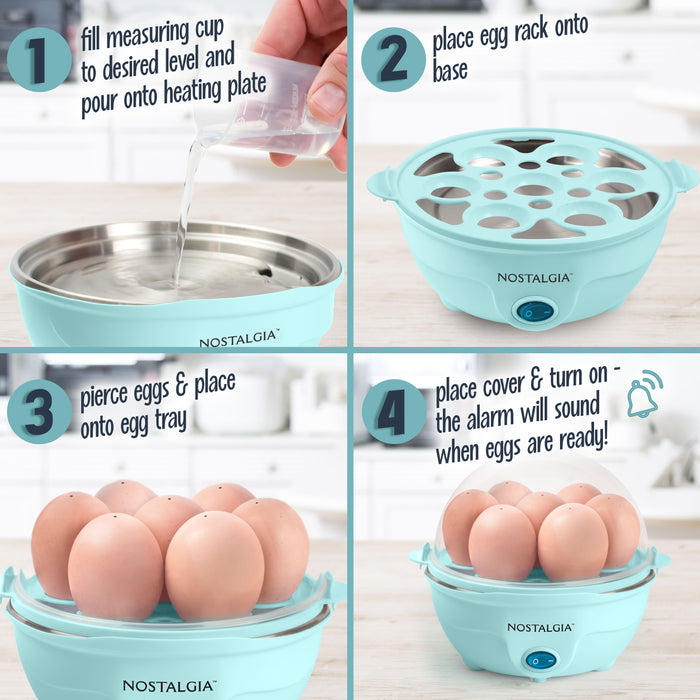
Preparing Your Egg Cooker
Preparing your egg cooker is the first step to making perfect eggs. Proper setup ensures safe use and better results. Follow these simple steps to get your egg cooker ready for use.
Setting Up The Appliance
Place the egg cooker on a flat, dry surface. Make sure it is near a power outlet. Keep the cooker away from water or wet areas. Plug the device in but do not turn it on yet. Check that the lid fits properly and the base is clean.
Adding Water Correctly
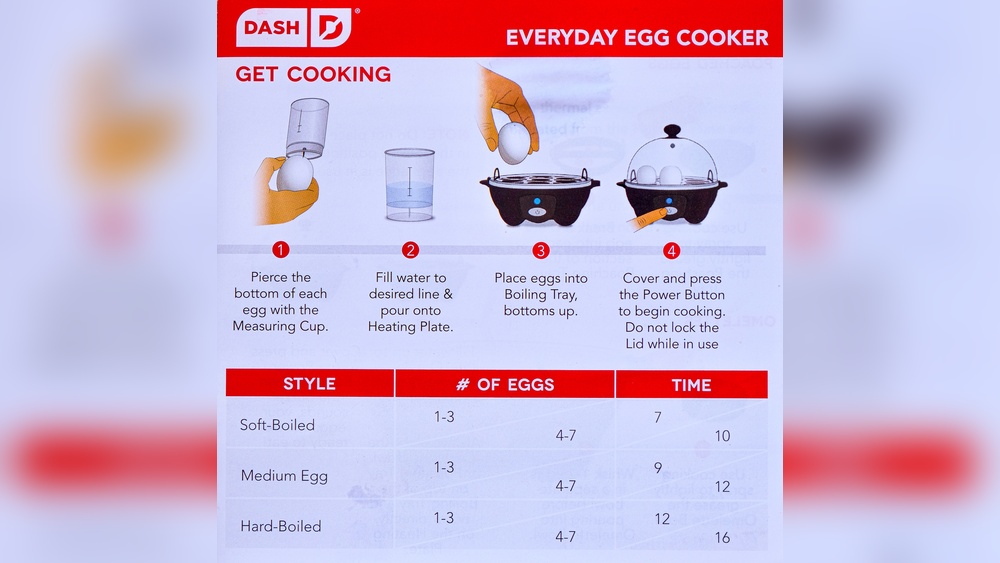
Use the measuring cup that comes with the cooker. Fill it with the amount of water needed for your eggs. Different egg types need different water levels. Pour the water into the cooker’s heating plate. Avoid overfilling to prevent spills or damage.
Using Accessories And Trays
Most egg cookers come with trays or racks. Choose the right tray for boiled, poached, or scrambled eggs. Place the eggs carefully in the tray to avoid cracking. Use the accessories as instructed for best results. Clean the trays after each use to keep them ready.
Cooking Different Egg Styles
Egg cookers make preparing eggs easy and quick. They help you cook eggs in different styles with little effort. Each style has a specific texture and taste. Knowing how to use an egg cooker for each style helps you enjoy eggs every day.
Soft-boiled Eggs
Soft-boiled eggs have a runny yolk and firm white. Add water to the cooker as the manual says. Place eggs in the tray and close the lid. Start the cooker and wait about 4 to 6 minutes. Cool eggs in cold water before peeling.
Medium-boiled Eggs
Medium-boiled eggs have a slightly soft yolk. Add a bit more water than for soft eggs. Set eggs in the cooker and close the lid. Cook for 7 to 9 minutes, depending on your cooker. Let eggs cool briefly before peeling.
Hard-boiled Eggs
Hard-boiled eggs have fully cooked yolks and whites. Fill the cooker with more water than for soft or medium eggs. Place eggs inside and close the lid tightly. Cook for 10 to 12 minutes for firm results. Cool eggs in cold water to stop cooking.
Poached Eggs
Use the egg cooker’s poach tray for poached eggs. Add the right water level to the base. Crack eggs into the poach tray cups gently. Close the lid and start the cooker. Poach eggs for about 6 minutes for soft texture.
Steamed Eggs
Steamed eggs are smooth and soft, like custard. Beat eggs with water or broth before cooking. Pour the mixture into the steaming tray or a heatproof bowl. Add water to the cooker as needed. Steam for 10 to 15 minutes until set.
Timing And Water Measurements
Timing and water measurements are key to perfect eggs in an egg cooker. The right amount of water controls how long the eggs cook. More water means longer cooking time. Less water means shorter cooking time. Knowing how to measure water and set time helps you get eggs just how you like them.
Water Level Guide
Most egg cookers have a water measuring cup. It shows levels for soft, medium, and hard eggs. Fill the cup with water to the line that matches your preference. Pour the water into the cooker’s heating plate. This water will steam the eggs and cook them evenly.
Adjusting Cooking Time
Cooking time changes with the water amount. More water means eggs cook longer and get harder. Less water cooks eggs faster and softer. Some cookers let you set time manually. Start with the recommended water level. Change it slightly to find your perfect timing.
Tips For Consistency
Use the same measuring cup every time. Keep eggs at room temperature before cooking. Place eggs in the cooker carefully. Avoid opening the lid during cooking. These tips help you make eggs with the same texture every time.
Cleaning And Maintenance
Keeping your egg cooker clean helps it work well for a long time. Dirt and water spots can build up after use. Cleaning and maintenance are simple steps. They keep your cooker safe and ready for the next batch of eggs.
Daily Cleaning Tips
Unplug the cooker before cleaning. Let it cool down completely. Wipe the outside with a damp cloth. Use a soft sponge and mild soap for the tray. Avoid harsh chemicals or metal scrubbers. Dry all parts with a clean towel. Clean the lid gently to avoid damage.
Descaling The Cooker
Hard water leaves white spots inside the cooker. To remove these, fill the water tray with equal parts vinegar and water. Let it sit for 15 minutes. Then, run a cooking cycle without eggs. After the cycle, rinse the tray well. Wipe the inside to remove any leftover vinegar taste.
Storage Recommendations
Store the egg cooker in a dry place. Make sure it is fully dry before storing. Keep the lid off or loose to avoid moisture buildup. Do not stack heavy items on top. This protects the cooker from damage and keeps it clean.
Credit: nostalgiaproducts.com
Troubleshooting Common Issues
Troubleshooting common issues with your egg cooker helps ensure perfect eggs every time. Some problems can happen during cooking. Knowing simple fixes saves time and stress.
Eggs Not Cooking Properly
Check the water amount. Too little water causes undercooked eggs.
Use the measuring cup that came with the cooker. Follow the instructions for water levels.
Make sure the lid fits tightly. A loose lid lets steam escape, affecting cooking.
Try cooking a few seconds longer if eggs seem soft. Every cooker heats differently.
Water Spills Or Overflows
Do not overfill the water reservoir. Use the exact amount recommended.
Place the cooker on a flat surface to avoid tilting.
Check for cracks or damage in the water container. Replace if needed.
Clean the cooker regularly to prevent blockages that cause overflow.
Appliance Not Turning On
Ensure the cooker is plugged in properly.
Check the power outlet with another device to confirm it works.
Look for a reset button on the cooker and press it if available.
Inspect the power cord for damage. Do not use if frayed or broken.
Creative Egg Recipes
Egg cookers make preparing eggs quick and easy. They help you create different egg dishes without much effort. Eggs are versatile and fit many recipes. Using an egg cooker, you can try new and creative meals. Here are some tasty ideas to enjoy your eggs in fresh ways.
Egg Salad Variations
Egg salad is a classic dish that you can change easily. Boil eggs in the cooker, then chop them into small pieces. Mix with mayonnaise or yogurt for a creamy texture. Add mustard, chopped celery, or onions for crunch. Try herbs like dill or parsley for fresh flavor. You can also add spices such as paprika or curry powder. Serve on bread, crackers, or lettuce leaves.
Breakfast Bowls
Breakfast bowls are filling and simple to make. Use eggs cooked in the egg cooker as the main protein. Add cooked grains like rice or quinoa at the bottom. Top with vegetables like spinach, tomatoes, or avocado. Sprinkle cheese or nuts for extra taste and texture. Season with salt, pepper, or hot sauce for more flavor. This meal keeps you full and ready for the day.
Egg Sandwich Ideas
Egg sandwiches are perfect for quick meals. Use hard or soft boiled eggs from your cooker. Slice eggs and place them on toasted bread or bagels. Add cheese, lettuce, and tomato slices. Spread mustard or mayo for a tasty touch. Try different breads like whole grain or sourdough. Change up toppings to keep sandwiches interesting.

Credit: www.youtube.com
Frequently Asked Questions
How Do I Use An Egg Cooker For Perfect Boiled Eggs?
Add water, place eggs in the tray, close the lid, and start the cooker. It cooks eggs evenly.
Can I Cook Different Egg Types In One Egg Cooker?
Yes, you can cook soft, medium, and hard-boiled eggs by adjusting water levels and cooking time.
How Long Does It Take To Cook Eggs In An Egg Cooker?
Cooking time varies from 6 to 12 minutes, depending on egg size and desired doneness.
Is Cleaning An Egg Cooker Easy After Use?
Yes, most parts are removable and washable. Just wipe the heating plate with a damp cloth.
Conclusion
Using an egg cooker makes cooking eggs quick and simple. You can prepare boiled, poached, or steamed eggs easily. Just add water, place the eggs, and start the cooker. It saves time and reduces mess in the kitchen. Eggs cook evenly without much effort.
This tool fits well in any busy routine. Try different cooking times for your favorite egg style. Enjoy tasty, healthy eggs every day without hassle. An egg cooker is a helpful addition to your kitchen.